
Photography is and has been since cameras became widely accessible, the single most practiced hobby in the world.
Nearly everyone these days, regardless of status and wealth has access to at least a basic camera of some sort. Natural vanity in our human nature seems to compel us to, or have someone else, take photos of us, of the food we eat, the places we visit and the clothes we wear.
For many of us the instant creative fulfillment offered by photography is both, very rewarding and intriguing. its one of the most accessible forms of creative expression available.
For me it all started while living in the UK in 1998. Coming from South Africa and the beautiful endless summers, I was not used to being confined to small indoor spaces without much hope of any outdoor activities due to bad weather. A very different life style.
I needed a hobby.
Photography magazines at the newstand caught my eye and soon, with two old cameras donated by my father in-law, I was hooked. shooting rolls and rolls of 35mm film and reading every photography book and magazine I could get. I must have spent thousands! No one was safe, everyone around me was potential subject matter, my unwilling subjects. My four year old bore the brunt of my creative learning curve, although i’m sure she didn’t mind back then.
Practice, review, critique that will be the single most important thing you do to improve your photography. You will need to learn why your pictures aren’t as good as you intended and what you could have done to improve them.
Before we get there though and even though these days the camera is capable of doing almost everything for you, if you want to become anything more than an average joe, you do need to know some of the technical stuff. You will need a camera capable of manual shoot mode, SLR or new mirrorless if possible and a sound knowledge of how it works.
We get to resolution in future posts, but for now and because there really is no point of shooting on low resolution, make sure your camera is set to best quality or highest resolution.
There are three sections to master in photography, they are 1. Focus, 2. composition and 3. Exposure. Every great photo is a mastery of those three factors.
This post will concentrate on the last of those, Exposure.
Exposure, essentially, is getting the camera to produce a scene as you see it with the naked eye, underexposed would be too dark and overexposed or “blown out” would be to light.
There are also three factors that control the exposure of your photo. they are 1. ISO rating, 2. Aperture and 3. Shutter speed. every manually exposed photograph involves a quick maths calculation of these three factors. Think of them as three liquid items that fill a glass, if you reduce one you have to add to one or both of the other two by the same factor to get the same total volume.
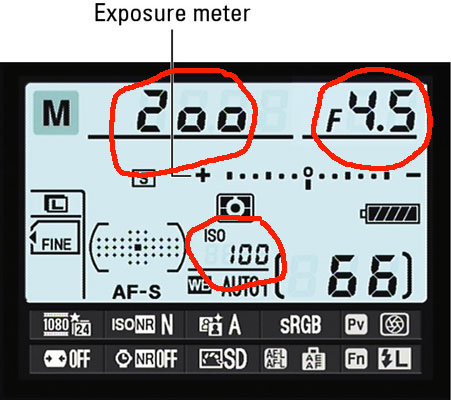
Most cameras will have a screen similar to this. For the purposes of this post, we are only concentrating on the three numbers circled in red. ISO (ISO 100) , F-Stop (F4.5) and Shutter Speed (200)
You will need to locate these setting and displays on your camera and figure out how they are adjusted. Your camera will need to be set to M, manual, to be able to independently adjust all three settings.
Good exposure control is in essence, a series of calculations to balance the three settings mentioned above to the situation you are trying to capture. Every situation is different and needs to prioritize one of the three and be balanced by the other two.
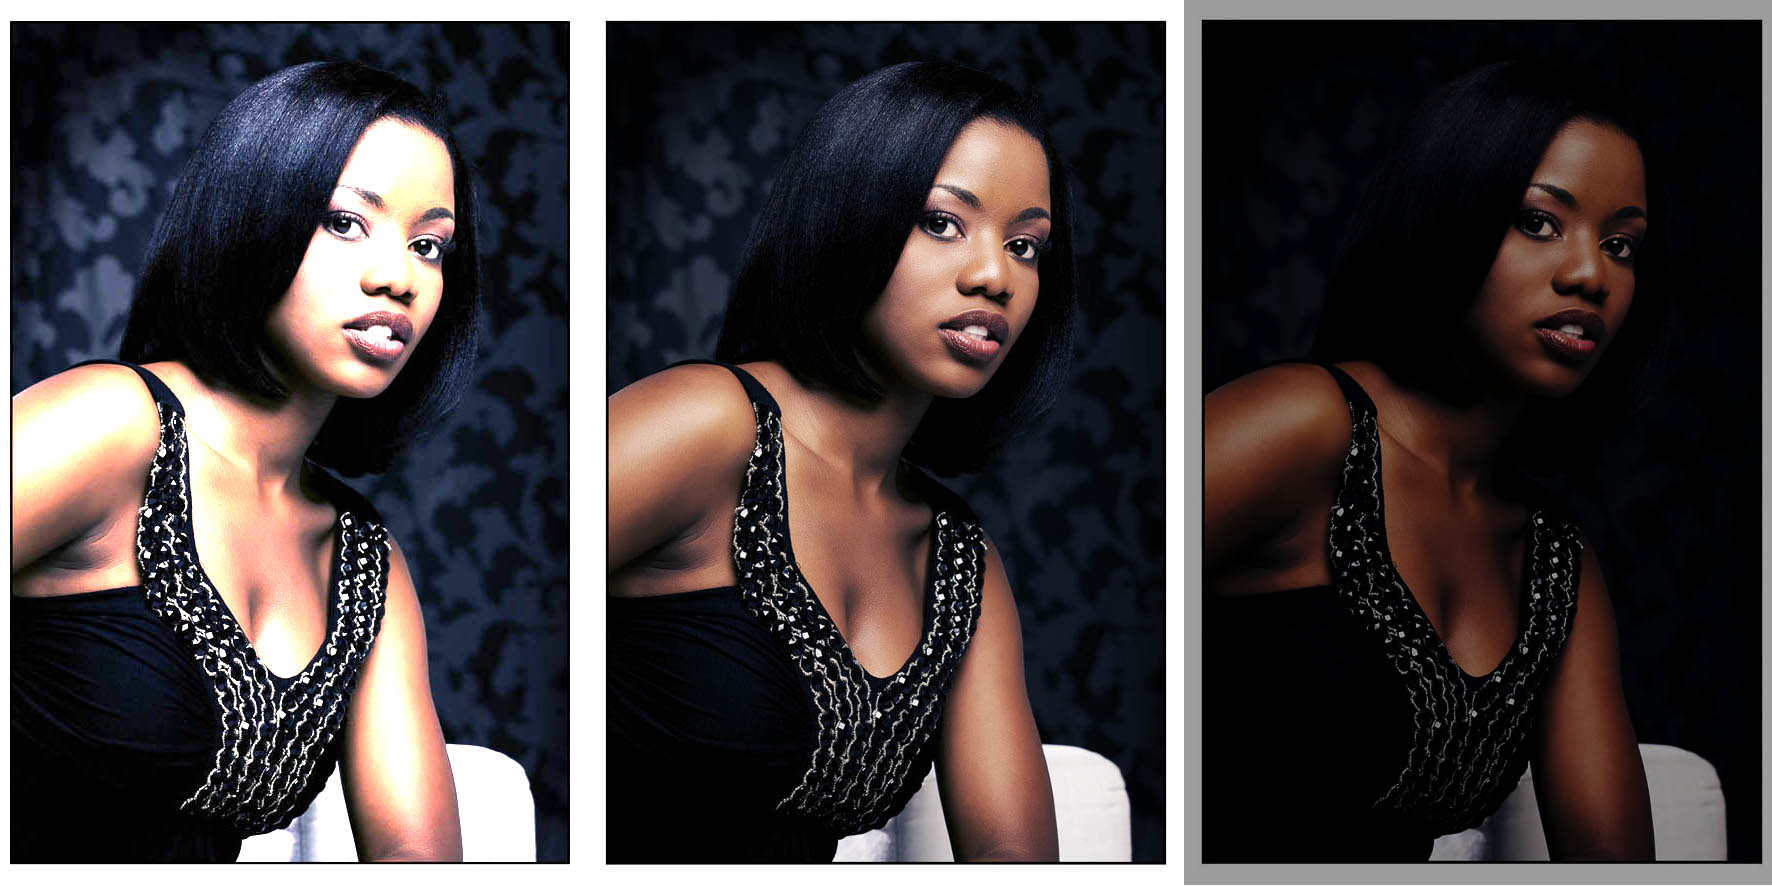
Let’s start with the ISO rating.: The settings, inner workings and terminology of a digital camera are all derived from the original technology of film cameras, the sensor as with the film sensitivity is displayed as a ISO number, i.e. ISO400, ISO800 etc. A high number, such as ISO1600 was film that was very sensitive to light and thus great for dark environments whereas ISO50 would refer to film that needed more light to form the image.
so why not just always use the highest ISO? well the compromise for super sensitive film and, although to a lesser degree, digital sensors, is image quality. When a high ISO is used you will notice a grainy texture on the image. Low ISO rated film like ISO100 produces a much cleaner and detailed image, just like the ISO100 setting on a digital camera.
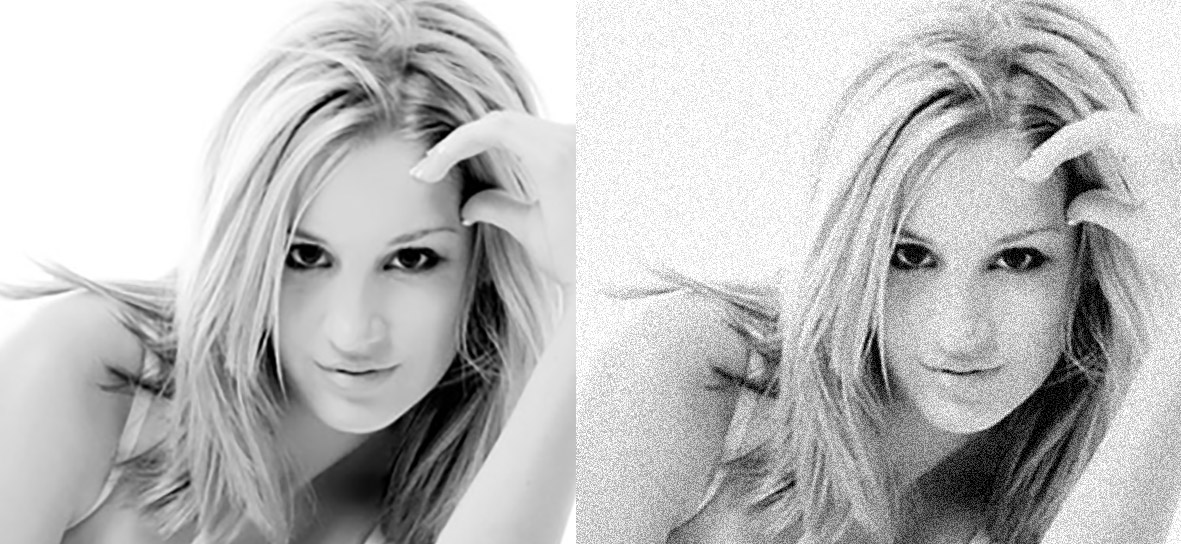
These quality issues, however, are really only noticeable when the image is enlarged. So for most web and social media requirements this quality issue is almost irrelevant.
Get out your camera and look for the ISO setting, test the theory and make sure you know where and how to change this setting on your camera. You will probably find the default setting is auto, so your camera will automatically change to the best ISO given the amount of light. This is fine if you have lots of light or quality doesn’t matter. But if you want to control the quality and all good photographer do, then you need to set it to the lowest ISO you can given the situation you are shooting. but well get to the detail of that after explaining the other two exposure settings.
Aperture. Back to the old fashioned film camera, the basic explanation for what aperture is, is that its a diaphragm, traditionally inside the actual lens. This diaphragm effects two things at the same time, 1. depth of field, which we get to later on, and 2. exposure. On your camera display you will see a number like f2.8 or f5.6 etc. This is the aperture setting, also known as an F-stop. It indicates how closed or open the diaphragm is. This is where most people start getting confused. That’s because, contrary to logic, a high number means less light because the diaphragm is almost closed and therefore less light is getting in, a low number means the diaphragm is wide open lots of light is getting in.
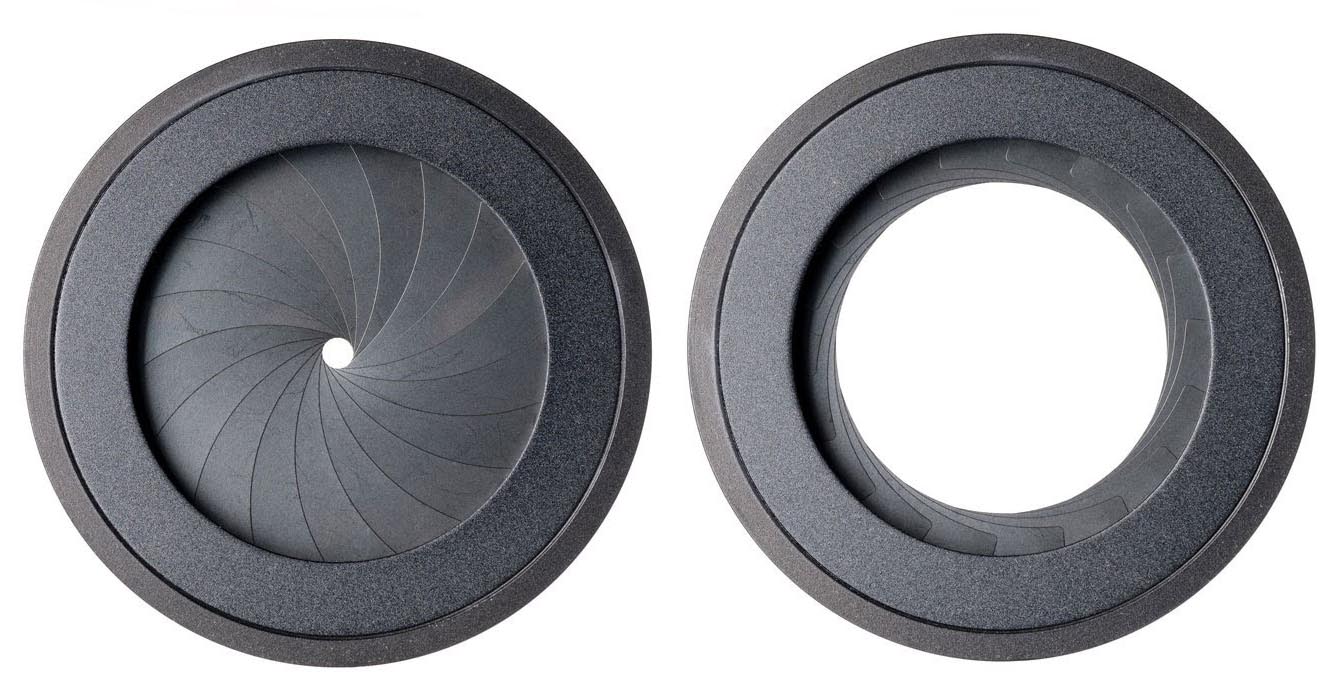
There will be lots of future discussion on why you would want a high aperture vs a low aperture. But for now, while we concentrate on exposure just try to absorb the simplistic fact that a high number like F11 means less light but more focus (depth of field) and assuming most of your photography in the beginning will be group shots of friends, you want a larger number, more depth of field which means if you photograph a group of people at different distances from your camera they will all be in focus. that’s important!
The last of the three exposure settings is Shutter Speed, The reading of the shutter speed is shown in seconds or more likely a fraction of a second, such as 1/500 (one five hundredth of a second, very fast!) So without going into massive detail about the various types of shutter curtains and how they work, all you need to know about them is that they are in essence light curtains that open and close and determine how long in seconds or fractions of seconds the “film” or sensor now days, is exposed to light. this exposure ‘burns” the image into the film or sensor.
The more light available the faster your shutter can be set to, in dark situations you will need to expose the sensor to light for longer to get the image to develop so you will need a longer exposure which means a slower shutter speed.
This works the same as an oven really, a 300deg oven will cook an item quicker than a 150deg oven, and you need to adjust your cook time depending on the heat of your oven.
Your camera will probably be capable of a shutter speed range at least as fast as at 1/2000th sec and as slow as 20 sec. Working with very slow shutter speeds gets tricky and will need to be covered this technique in a separate post.
For now remember this golden rule for handheld photography: Your shutter speed should never be slower then 1/(your lens focal length). i.e. if you are shooting with a 50mm lens never shoot on a slower shutter speed then 1/50th sec. Also remember moving subjects need faster shutter speeds. A human running at full sprint will need a shutter of at least 1/500th sec or the person will be blurred.
To recap let’s combine the three factors in a quick equation. You start by choosing your ISO setting. Let’s assume you are in a garden in daylight on a sunny day. Given you have lots of light, you want to choose the lowest ISO, normally ISO100, so the quality of your photo is as good as possible. Because you have lots of light we’ll stick to a nice fast shutter speed of 1/500. So we’ve chosen two of the three variable settings and now need the cameras light meter to tell us what the third setting should be.
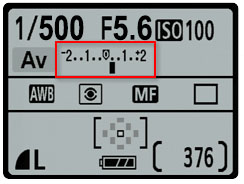
Take a look at the red area in the image to the left. this is the exposure indicator. The small sliding bar will move left and right between the negative and positive with a zero reading being a “perfect” exposure. Any reading to the negative being underexposed and any reading to the positive being overexposed.
So we are outside in sunlight. Your camera is set to ISO100 with our shutter speed set to 1/500th sec. The Aperture is currently set to F5.6. Our built-in camera light meter tells us that this is very close to perfect, only slightly overexposed. This reading should produce a decent image, however you may want to get it closer or even slightly underexposed.
To do this you have three possible variables: ISO, Aperture, Shutter speed. Remember, when we started we had already set the ISO to the lowest it could go to get the best quality, so we don’t have the option to decrease this any further. So there are only two other options. Increase the shutter speed or increase the aperture. Increasing either by just one click will result in a slightly darker image. There isn’t only one correct answer. Your decision needs to depend on what your subject is.
Can you figure it out?